Updating my dot net core mvc project from version 2.2 to 3.0 I got an error saying „project.assets.json doesn’t have a target for .NETCoreApp,Version=v2.2“. I deleted the mentioned JSON file which was new generated but nothing changed. After searching for my problem in google I found this link https://github.com/dotnet/sdk/issues/1321 where similiar problems were reported. One of the answers was a good one: Delete your publish profile and try again. This worked for me and I hope for many other people out there getting this error.
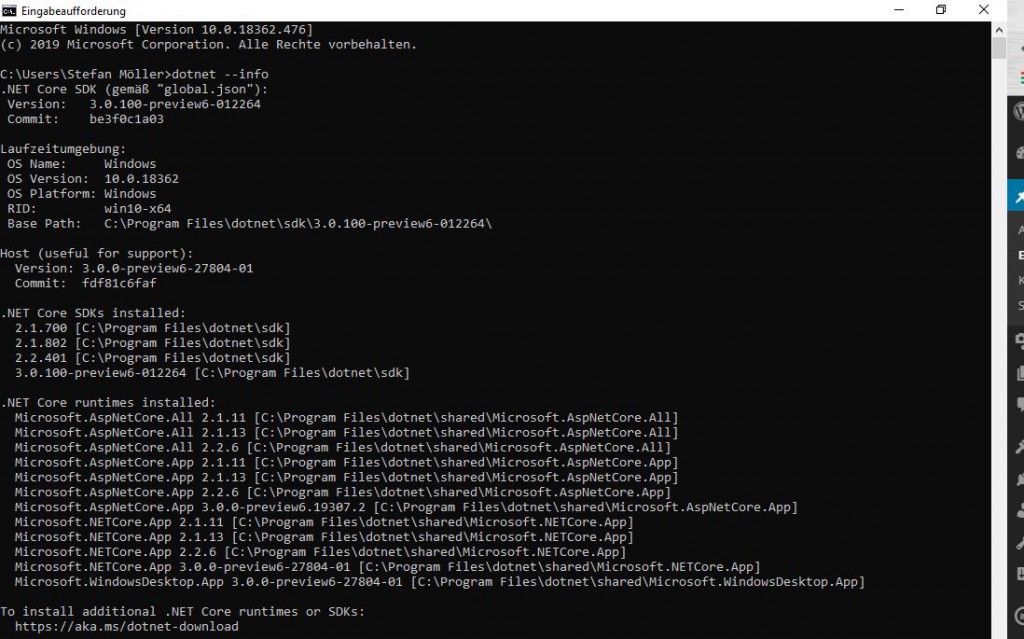
If want to check which .net core version, sdk’s and runtimes are installed on your machine you can easily check in console by typing:
dotnet --info

You will get a result looking like:
Getting .net core infos in console
Like mentioned in the result you can install another version or sdk by visiting https://aka.ms/dotnet-download and following the instructions or do it directly in visual studio.
There you have to open the project properties and select the targetframework dropdown. You can find an option named install another framework there. By clicking on it the browser opens and you’ll be transfered to https://dotnet.microsoft.com/download/visual-studio-sdks where you can download runtimes and sdk’s.
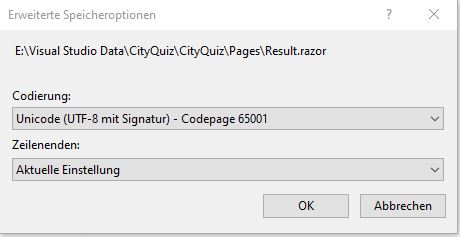
Wenn in Razor Pages beim Ausführen des Projekts Umlaute nicht richtig angezeigt werden kann das daran liegen, dass die Datei mit dem falschen Encoding gespeichert wurde. Um dieses zu checken kann man einfach in Visual Studio auf Datei -> Speichernunter klicken. Im Speichern Dialog ist neben dem Speichern Button ein kleiner Pfeil nach unten. Wenn man diesen anklickt gibt es die Option Mit Codierung speichern. Dieses wählt man aus.
Im Anschluss wird man gefragt, ob man die vorhandene Datei ersetzen möchte. Dieses bejaht man. Nun öffnet sich ein Dialogfenster (siehe Screenshot) in dem man die Codierung auswählen kann. Unicode (UTF-8 mit Signatur) – Codepage 65001 sollte hier die Wahl sein und diese Auswahl bestätigt man mit OK. Wenn man nun das Projekt erneut startet sollten die Umlaute korrekt dargestellt werden.
Auswahl der Codierung für eine Razor Page Datei im Dialogfenster.
If you want to do a http(s) call per httpclient to an external destination in a Asp.NET Application on ionos webhosting you have to use a proxy server. Otherwise you’ll get a timeout of connection trial after a while with the following error message:
System.Net.Http.HttpRequestException: A connection attempt failed

because the connected party did not properly respond after a period of

time, or established connection failed because connected host has

failed to respond
If you want to use a scoped service in a singleton service in a Asp.Net Core MVC project you can’t inject it via constructor injection. You’ll have to create a scope when needed. In my case I needed to use a DbContext service regisered with .AddDbContext as a scoped service in startup.cs into a hosted service.
First you have to create a service inheriting of IHostedService (Microsoft.Extensions.Hosting) with the following code:
public abstract class HostedService : IHostedService
{
// Example untested base class code kindly provided by David Fowler: https://gist.github.com/davidfowl/a7dd5064d9dcf35b6eae1a7953d615e3

private Task _executingTask;
private CancellationTokenSource _cts;

public Task StartAsync(CancellationToken cancellationToken)
{
// Create a linked token so we can trigger cancellation outside of this token's cancellation
_cts = CancellationTokenSource.CreateLinkedTokenSource(cancellationToken);

// Store the task we're executing
_executingTask = ExecuteAsync(_cts.Token);

// If the task is completed then return it, otherwise it's running
return _executingTask.IsCompleted ? _executingTask : Task.CompletedTask;
}

public async Task StopAsync(CancellationToken cancellationToken)
{
// Stop called without start
if (_executingTask == null)
{
return;
}

// Signal cancellation to the executing method
_cts.Cancel();

// Wait until the task completes or the stop token triggers
await Task.WhenAny(_executingTask, Task.Delay(-1, cancellationToken));

// Throw if cancellation triggered
cancellationToken.ThrowIfCancellationRequested();
}

// Derived classes should override this and execute a long running method until
// cancellation is requested
protected abstract Task ExecuteAsync(CancellationToken cancellationToken);
}
The following code in the singleton service works for me:
dotnet new -i Microsoft.AspNetCore.Blazor.Templates::3.0.0-preview9.19424.4
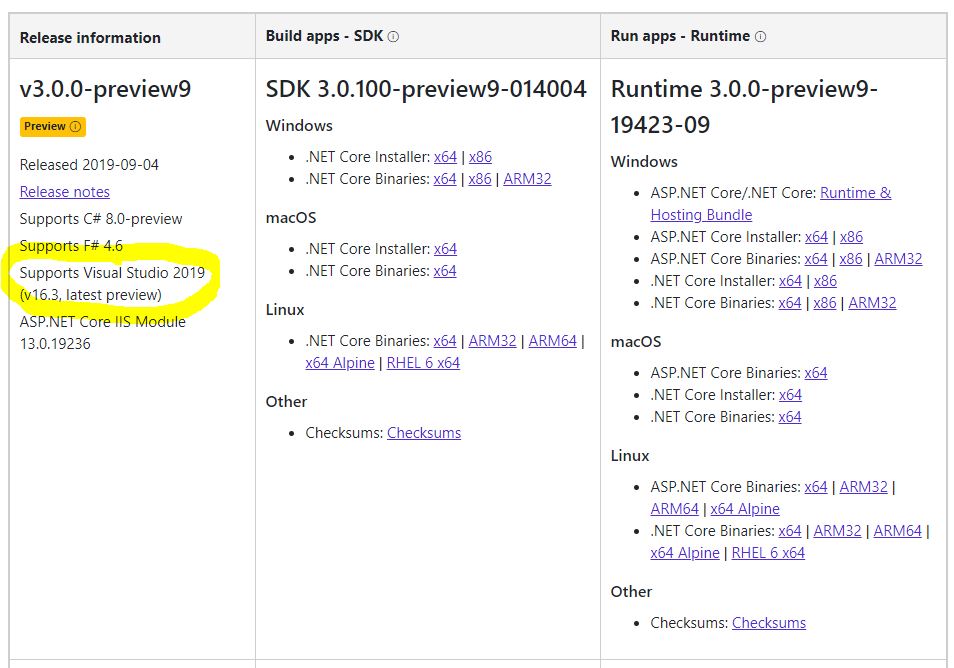
Now I wanted to create a new project and select Blazor as template. But there were no .net core 3 templates in the selection only core 2.1 and 2.2 project templates. Afterwords I tried many things to get it working but nothing helped.
Solution: I should have read the instructions in a better and more sensible way. I missed an important detail: The latest .net Core 3 preview version only works with the latest Visual Studio preview version.
.net Core SDK download page
My installed version of Visual Studio was Community Edition 16.2.5. No chance to run the latest SDK version. I had to deinstall SDK 3 preview 9 and installed v3.0.0-preview6 because this SDK version supports Visual Studio 2019 v16.2.
Coming back to Visual Studio and creating a new project I could choose from .net Core 3 templates as expected.
Today I tried to connect to my Azure DevOps Account via Visual Studio to push some changed data of a project to git. First I got the error „Git failed with a fatal error. Authentication failed„. In my case the solution was to delete an entry in the windows credential manager. Read here how to open it. Just open the tab Windows Credentials and search for an entry looking like git:<yourdevopsservername>. Then you can delete it!
Afterwords I tried to open Visual Studio again to push my data to git. I got an error again saying „could not read username for visual studio terminal prompts disabled„. The solution for this case was to delete the file %localAppData%\GitCredentialManager\tenant.cache.
Hope this two steps will help someone to not spend more than one hour on solving the problem like me 😉
Often people use Bearer Authentication for securing API requests. Normally everything works fine and you can send the token as header information and if the token is valid you can call the API without getting status code 401 unauthorized. In my case I could call the API once and while the second try I got 401 unauthorized. After hours of error searching I find my mistake. It’s very important to load the parts in startup.cs in the right order.
services.AddAuthentication
services.AddMvc
and
app.UseAuthentication
app.UseMvc
Authentication methods have to be called before Mvc methods to handle authentication early in the pipeline.
If you load it in the wrong order you might get a problem like me. Hope this hint helps somebody to save time 😉
Mit einem IMAP Konto hat man es in Outlook nicht immer ganz einfach. Normalerweise kann man eine E-Mail nachverfolgen wenn man mit der Maus einen Rechtsklick auf das Fähnchen tätigt und die Auswahl der Optionen öffnet sich. Bei einem IMAP Konto ist es etwas anders.
Mit Outlook in Kombination mit einem IMAP Konto hat man zwei Möglichkeiten eine Nachverfolgung einzurichten:
1. Möglichkeit:
Man geht mit der Maus über die betreffende E-Mail und hält die linke Maustaste gedrückt. Nun zieht man die E-Mail auf das Aufgaben Icon und lässt sie dort fallen. Dann öffnet sich ein neues Fenster in dem man die Nachverfolgung einrichten und definieren kann.
Das Aufgaben Icon in Outlook.
2. Möglichkeit:
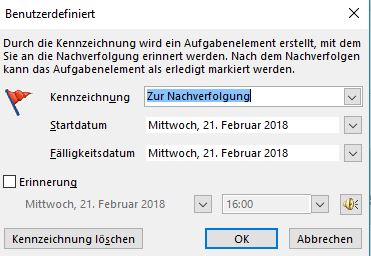
Eine weitere Möglichkeit in Outlook mit einem IMAP Konto eine E-Mail zur Nachverfolgung einzurichten ist die Tastenkombination STRG + Shift + G. Zuvor muss die entsprechende E-Mail in der Liste markiert worden sein.
STRG + SHIFT + G öffnet dieses Aufgaben Dialogfenster.
Die einfachste Möglichkeit um in C# aus einem DateTime Objekt den Deutschen Tagesnamen zu erhalten ist die Benutzung des Formats „dddd“ in Kombination mit der CultureInfo „de-DE“. Als Beispieldatum nehmen wir den 01.01.2020, welcher ein Mittwoch ist.
Der Code zur Ermittlung der Wochentagsbezeichnung sähe dann wie folgt aus:
var tagesName = new DateTime(2020, 1, 1).ToString("dddd", CultureInfo.CreateSpecificCulture("de-DE")); //liefert den string "Mittwoch"
Ein klarer Vorteil dieser Methode gegenüber beispielsweise einer Ermittlung per Unix Timestamp ist, dass man sich keine Sorgen um die Zeitzonen machen muss.
Wir verwenden Cookies, um unsere Website und unseren Service zu optimieren.
Funktional
Immer aktiv
Die technische Speicherung oder der Zugang ist unbedingt erforderlich für den rechtmäßigen Zweck, die Nutzung eines bestimmten Dienstes zu ermöglichen, der vom Teilnehmer oder Nutzer ausdrücklich gewünscht wird, oder für den alleinigen Zweck, die Übertragung einer Nachricht über ein elektronisches Kommunikationsnetz durchzuführen.
Vorlieben
Die technische Speicherung oder der Zugriff ist für den rechtmäßigen Zweck der Speicherung von Präferenzen erforderlich, die nicht vom Abonnenten oder Benutzer angefordert wurden.
Statistiken
Die technische Speicherung oder der Zugriff, der ausschließlich zu statistischen Zwecken erfolgt.Die technische Speicherung oder der Zugriff, der ausschließlich zu anonymen statistischen Zwecken verwendet wird. Ohne eine Vorladung, die freiwillige Zustimmung deines Internetdienstanbieters oder zusätzliche Aufzeichnungen von Dritten können die zu diesem Zweck gespeicherten oder abgerufenen Informationen allein in der Regel nicht dazu verwendet werden, dich zu identifizieren.
Marketing
Die technische Speicherung oder der Zugriff ist erforderlich, um Nutzerprofile zu erstellen, um Werbung zu versenden oder um den Nutzer auf einer Website oder über mehrere Websites hinweg zu ähnlichen Marketingzwecken zu verfolgen.